The BudTrainer Method™ Lesson #5
How to Defoliate & Prune Hemp Plants
(works with AUTOFLOWERS)
Written by cannabis production expert Henrique Dias - Updated on Oct 1, 2024
DISCLAIMER: Everything taught and sold by BudTrainer® is to be used strictly for legal purposes. We condemn the production of illegal substances and it is your duty to ensure that you are complying with the law. The words "hemp", "cannabis", "weed", and "marijuana" are used interchangeably to refer to the same plant (legal hemp with less than 0.3% THC) for the purposes of this lesson.

The Surest Way To Increase Airflow & Prevent Pests
Did you know that nearly 100% of commercial cannabis producers defoliate and prune their cannabis plants? They wouldn’t be doing it if it wasn’t increasing their yields. In fact, if left unpruned, your plant can attract mold and bugs such as spider mites, thrips, and aphids. But if you defoliate and prune it properly it will yield bigger buds, more trichomes, and an overall larger yield (with no pests). So let’s get to work.
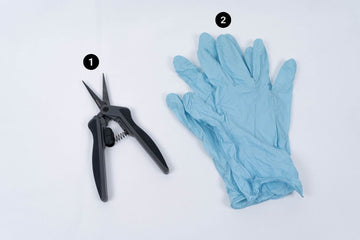
Tools & Materials
- Trimming scissors
- Disposable gloves
When Is The Right Time To Defoliate & Prune Weed?
The BudTrainer Method™ has 3 stages of defoliation, the first one starting during the vegetative stage, the second one 3-4 weeks after flowering, and the last one just before harvest. You already learned how to do some defoliation and pruning on Lesson #4: How to Train Cannabis Plants, but here we will cover it in more detail.
3 Stages of Cannabis Pruning & Defoliation
The BudTrainer Method™ has three stages of defoliation.
The first two stages are meant to help you clear out old leaves and leaves that are blocking airflow to the plant, in order to allow for more transpiration and thus more growth.
The last stage, on the other hand, is meant to help you prepare your plant for harvest, giving it more light exposure during its last week and making it easier to harvest when the time comes.
1. Vegetative Stage Defoliation
When: week 5+ of the vegetative stage
Stage 1 of defoliation and pruning is meant to set up a strong canopy structure when your plant is young. By removing old and shaded leaves, and removing small branches, your plant transfers its energy toward the stronger branches and leaves left behind, thus promoting a much stronger base for your plant.
Growing Outdoors?
Stage 1 can be repeated every 2 weeks when growing outdoors.
Growing Autoflowers?
Skip Stage 1 if you are growing autoflowers, as they only get 4 to 5 weeks of vegetative stage time.
2. Flowering Stage Pruning & Defoliation
When: 3 to 4 weeks after switching to flower
Stage 2 of the defoliation and pruning process is the most essential stage. Performed after the flowering stretch phase, stage 2 is where you get to “clean up” the small and shaded leaves, but also all small bud sites that would otherwise form larfy, popcorn bud. You will leave behind only bud sites that can form big buds.
Growing Outdoors?
The process is exactly the same, but since you can’t know exactly when marijuana plants switch to flower, wait to defoliate until your plant has stopped stretching, and started forming bud crowns.
Growing Autoflowers?
Instead of performing Stage 2 in one day, prune and defoliate on a daily basis, only removing 3 to 5 leaves or branches in order to avoid stress.
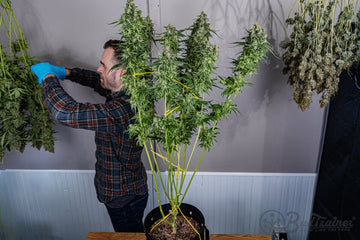
3. Pre-Harvest Defoliation
When: 1 week prior to harvest day, or on harvest day itself
Performed one week before harvesting or on harvest day, Stage 3 is where you remove all fan leaves that don’t have trichome heads attached to them. This not only makes it easier to trim your buds later on, but it also helps expose the lower buds to more light for that last week of flowering, thus helping them reach the same maturity as the top ones.
Whether you are growing autoflowers or outdoors, Stage 3 is always the same.


BudTip: How To Defoliate Weed Like A Pro
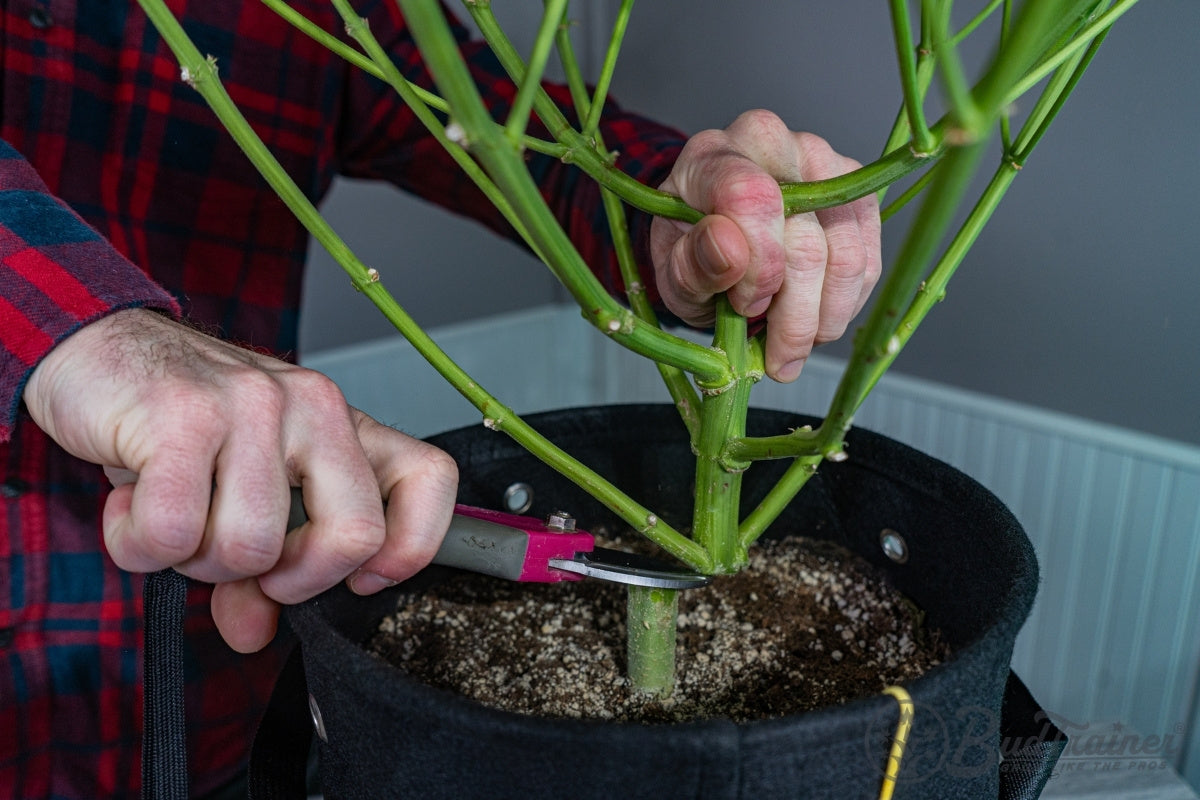
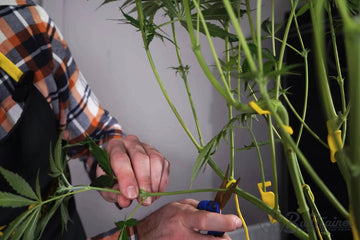
With Scissors (branches & leaves)
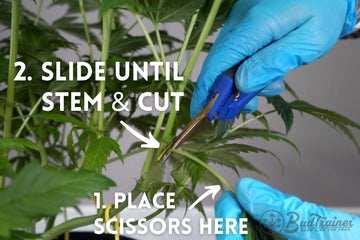
This technique is essential for cutting branches, since you can’t remove them by hand. However, you can also defoliate your leaves with scissors in order to get cleaner cuts, while keeping your hands clean. Here is how to do it:
- Start by pinching the leaf or branch with your non-dominant hand;
- Place the tips of the open blades somewhere on the stem, and close the blades just enough to touch the skin but not cut into it;
- Run the blades all the way down the stem until it stops at the branch and can’t go any further;
- Close your blades and cut the leaf or branch you want to prune;
- Pull the leaf or branch off with your non-dominant hand.
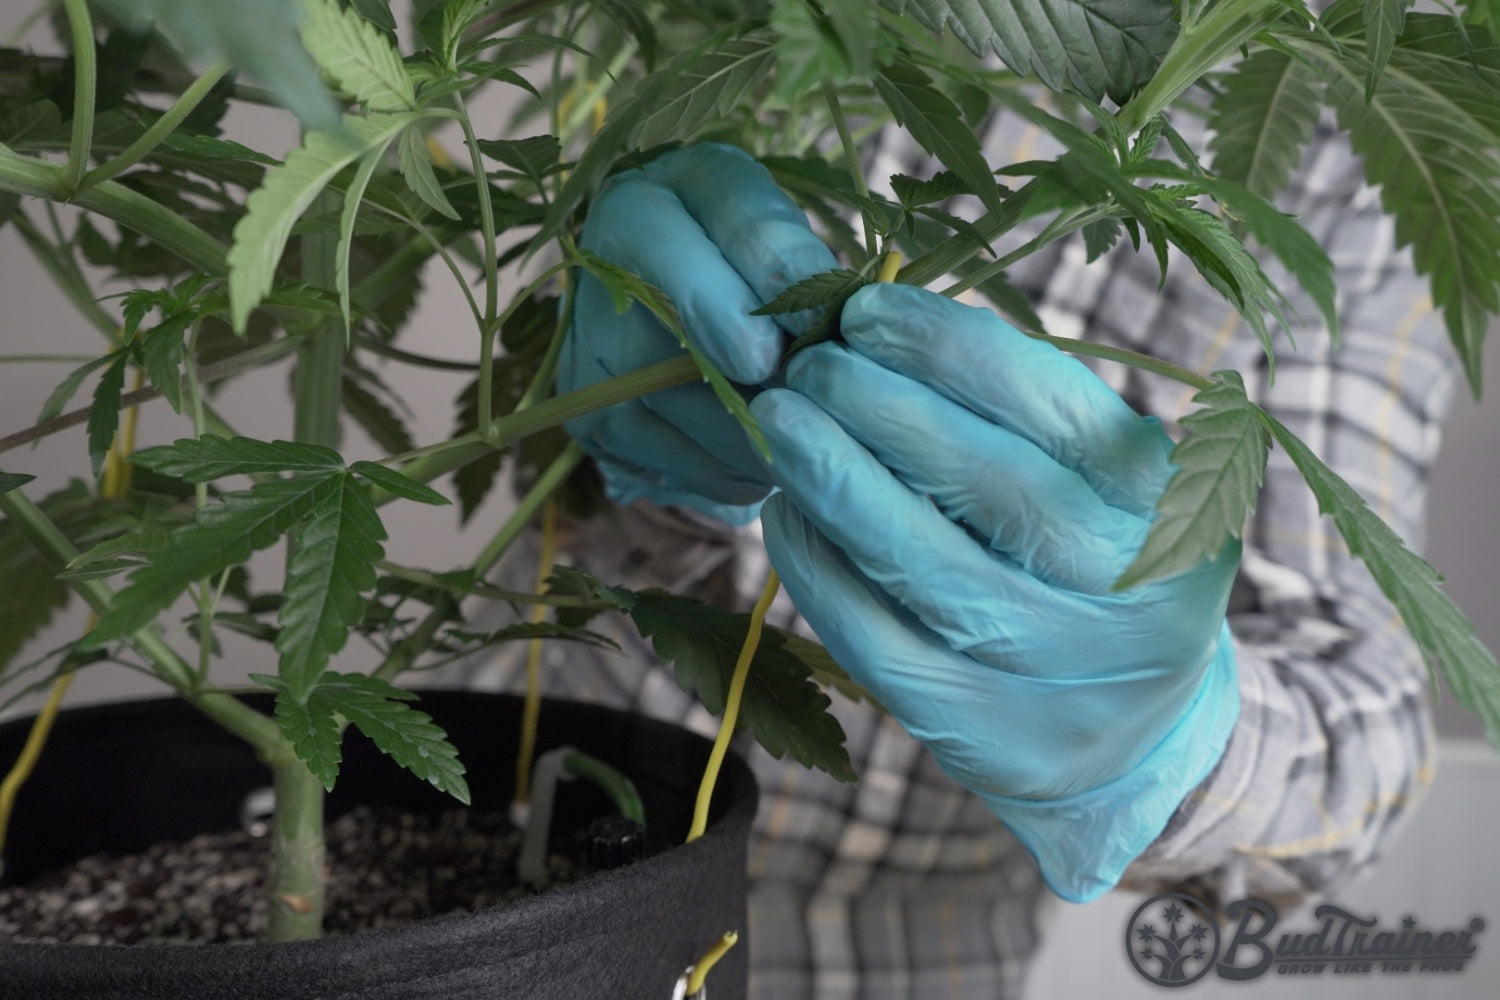
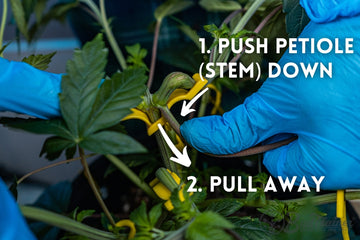
By Hand (leaves only)
This technique is super fast and easy to accomplish, and anyone can do it. However, it only works on leaves and not branches, as they have a more fibrous skin and don’t come off easily. Here is how to do it:
- Start by pinching the leaf at the base of the stem;
- Bend the leaf down by 90 degrees until it cracks (if it doesn't crack, twist it with your fingers back and forth to break it);
- Pull the leaf away from the plant until it comes off.
Now that you know how to remove your leaves and branches from your plant, it’s time to break this process up into the 3 Stages of cannabis pruning and defoliation.
If you are growing autoflowers, you can skip straight to Stage 2.
Stage 1. Defoliating & Pruning During Veg
After 5 to 7 weeks from germination (1 to 2 weeks after topping), your plant will be ready to get defoliated and pruned (as well as trained, which you learned how to do in Lesson #4: How to Train Cannabis).
At this point, many leaves and small branches will have appeared, inhibiting your plant's ability to absorb CO2 and light in the center of the canopy. This means they will start consuming about as much energy from the plant as they produce, so they are not useful anymore. In fact, the older they get, the more energy they consume, which is why removing them is a good idea.
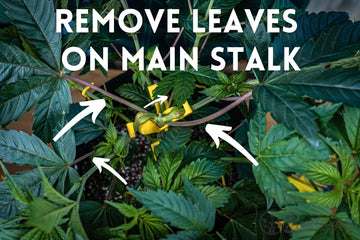
Step 1. Defoliating Main Stalk Leaves
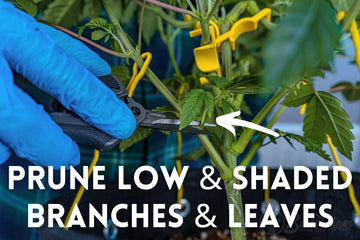
Leaves and branches in the shade are also a net-negative in energy production, meaning they take more away from your plant than they contribute to it. Just imagine what would happen to a solar panel that is installed UNDER the roof, and not on top? The same is true for those small, shaded leaves and branches. So go ahead and, with your garden scissors, cut them off.
Step 2. Pruning Shaded Leaves & Branches
The main stalk leaves are the oldest leaves on your plant, and as much as they may look plump, green, and beautiful, it’s time to remove them so that your plant can concentrate on the other leaves. In fact, after removing these large and old leaves, your younger ones will become twice as large in a matter of only 1 to 2 days.
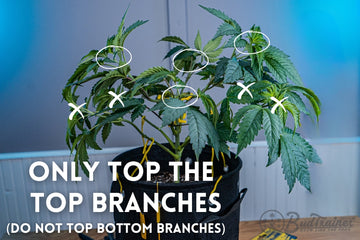
Step 3. Topping For The 2nd Time
Topping isn’t be anything new to you at this point, as you already learned how to top your cannabis plants on Lesson #3: How to Top Cannabis and again on Lesson #4: How to Train Cannabis. Topping is also considered a pruning technique, and this is where you get the chance to top your cannabis plants for the 2nd time.
To top again, simply cut the top 1 inch from each of the 4 top branches, leaving behind 2 or 3 nodes on each (4 to 6 new growth sites each).
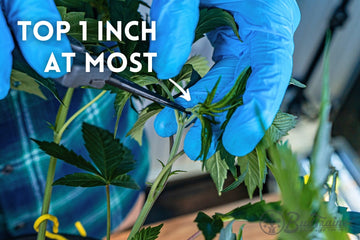
When topping for the second time it is important to only top the 4 top branches, and not the 4 bottom branches, as they already have to “work” harder to make their way to the top of the canopy. By topping only the top nodes, the lower ones can “catch up”.
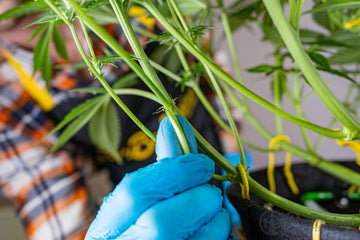
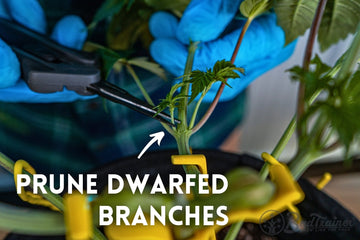
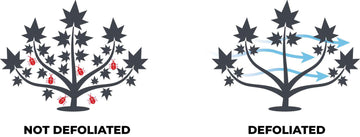
BudTip: Always Prune Dwarfed Branches
After the initial defoliation and pruning, inspect all remaining nodes and prune any growth sites that have become dwarfed when compared to its opposite counterpart. By removing the small growth site from the pair (as pointed by the white arrow below) you help your plant focus its energy on the larger growth site, instead of wasting it on a small branch that will never grow past the top of the canopy.
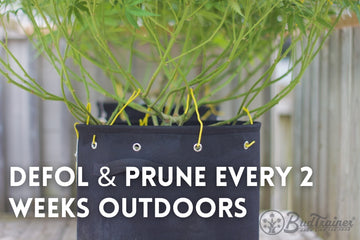
Pruning & Defoliating Outdoor Marijuana?
If you are growing your plants outside, you can continue pruning and defoliating it on Stage 1 every 2 weeks. This will ensure your old leaves are consistently removed, allowing the new ones to capture more light and airflow. Not to mention, the pressure from pests outdoors is much greater, and this will help ensure your plant stays safe.
Pruning & Defoliating Autoflowers?
Autoflowers do not need to be defoliated or pruned during the veg stage since they only get about 4 to 5 weeks of vegetative time. If you are growing autoflowers you can start directly on Stage 2, after 3 to 4 weeks in the flowering stage.
Stage 2. Defoliating & Pruning During Flower
Most strains will go through a vigorous growth period between the time you flip them to flower and the 3rd week of flowering. While it is really important NOT to defoliate your plants during these 20-25 days of the stretch phase, it is equally as important to trim them back after this period is over. This is the last chance you have to prune any unwanted growth or leaves before your plant starts filling up with flowers.
This is why Stage 2 of defoliation and pruning is the most important one. During this stage you will be selecting the final branches your plant will grow, removing everything that doesn’t have a good potential for growth. This is where you get to pick only the best tops in order to let them develop into high cannabinoid buds.
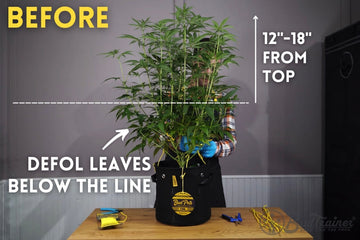
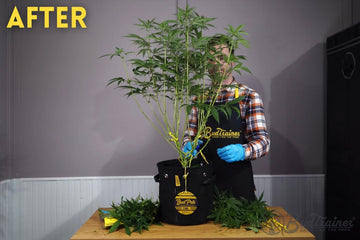
Step 1. Defoliate Shaded Leaves
Pick a line 12” to 18” from the top of your canopy, and defoliate all leaves and branches that start below that line. This means your leaves aren’t catching any more light and are blocking the airflow from the bottom to the top, and by removing them you will promote more growth up top.
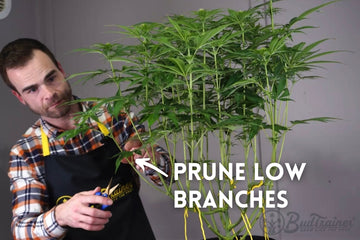
Step 2. Prune Low Branches
During the stretch phase, your plant will also select certain branches to send energy to and certain branches to “dwarf”. These dwarf branches will never grow strong, and by removing them your plant sends even more energy to the strong branches left behind, while also having more room for airflow. So remove all dwarf branches whose tops are in the middle of the canopy, more than 6” below the top. They will often be much thinner than your strong branches, and easy to spot.
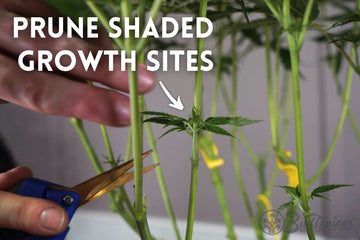
Step 3. Prune Shaded Growth Sites
Just as you pruned dwarfed branches due to poor light penetration and airflow, you can remove all growth sites (small clusters of pistils) that are more than 12” or 18” below the top of the canopy. This means they will never catch much light and will thus form into larfy popcorn bud, which is very undesirable. When you remove the small larf, your plants focusses even more energy toward your top buds.
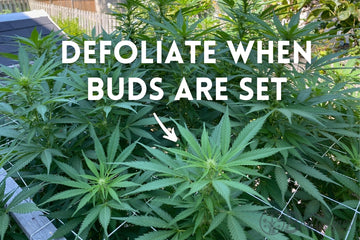
Defoliating & Pruning Outdoors?
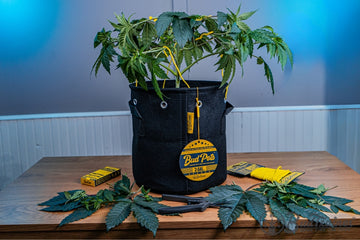
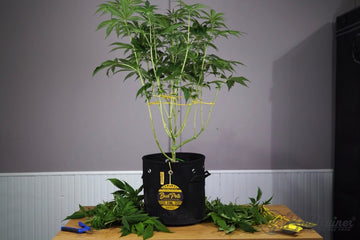
If you are growing your plants outside, there is no difference in Stage 2. However, since it is hard to know exactly when your outdoor plants switched to the flowering stage, we recommend executing Stage 2 only when your plant has stopped “stretching”, or growing in length. This means your buds will be set (like in the photo below), and ready for some defoliation.
Defoliating & Pruning Autoflowers?
If you are growing autoflowers, instead of executing Stage 2 in a single event where you remove a lot of leaves and branches at once, you should only remove 3 to 5 leaves and/or branches a day, over a period of 2 to 3 weeks. If you prune and defoliate more than 3 to 5 leaves or branches a day, your autoflower can go into shock mode and stunt its growth. If you remove only a few a day, however, it’s no different than what your plant would experience in nature, as animals and the weather end up breaking off some leaves and branches every day.


BudHuggers®
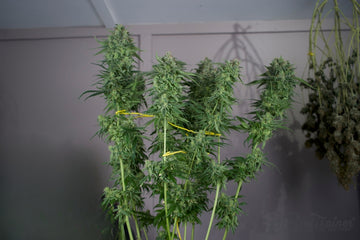
Stage 3. Defoliating & Pruning Pre-Harvest
One week before harvest time is when most of your pistils are brown and the trichomes are going milky and amber. We recommend one last defoliation (no pruning) at this stage for a few reasons.
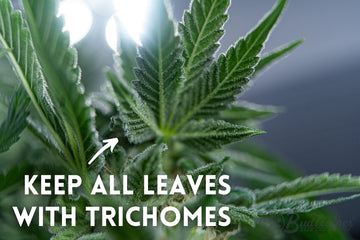
- It helps uncover those lower buds and sugar leaves that have been shaded by a big fan leaf for the last 4 to 6 weeks.
- It causes a mild stress on your plant and forces it to allocate all of its resources to the buds, which results in more trichome and cannabinoid production.
- It saves you over 50% of the time trimming because most of your fan leaves will have been already removed.
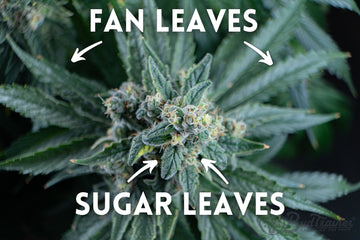
Sugar Leaves vs Fan Leaves
Fan leaves - these are the larger leaves that come out directly from the branches. Fan leaves are the symbol of cannabis (although we hardly use them) and their main function is to collect light and CO2, store nutrients, and transpire. Fan leaves have no use after harvest, since they hardly have trichomes attached to them.
Sugar leaves - these are small leaves that stick out of the buds and are covered in trichomes (hence the name). They are much smaller, and their main function is to store nutrients for the flowers and grow trichomes to attract pollen. For this reason, sugar leaves contain a lot of THC and CBD, and should always be harnessed for procoessing (like making hash or edibles).
Defoliate ALL Fan Leaves
This part is easy - start with the largest fan leaves at the lower part of your canopy, and as you go up, remove ALL of them. If your fan leaves don’t have any trichomes on the leaf itself of the leaf stem, you can throw them out.
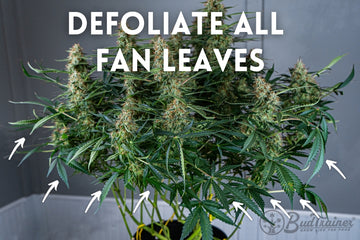
However, if your fan leaves are covered in trichomes, you can keep them aside for making hashish or extracting.
While you can do the pre-harvest defoliation by hand, cannabis leaves tend to pull skin strings from your main stalk as you remove them like this. This can damage your lower buds, which is why we recommend using scissors to execute all of Stage 3.
You Are Off To A Bountiful Harvest
In one week your plant will be more than ready for harvesting, and all you will have to do is chop it. Your lower buds will have been exposed to more light and thus reached maturity, and the amount of trimming left for you to do is minimal.
FAQ: What are the differences between defoliating indoors vs outdoors?
Use this text to share information about your brand with your customers. Describe a product, share announcements, or welcome customers to your store.
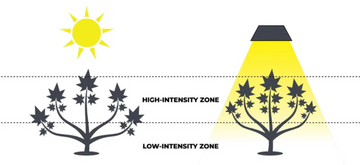
Light Exposure
Our sun is nearly 100 million miles away, which means that it doesn’t matter if your plant is a few ft taller or shorter - the bottom and the top leaves will feel no difference in light intensity (as long as they are not in the shade). However, when it comes to indoor lighting, the intensity of your grow light decreases a lot as you get farther away from the source - from 5 to 10 times weaker every foot of distance away.
Airflow & Pest Prevention
Airflow is essential for plants to absorb CO2 as it helps circulate the air released by the leaves (which is full of oxygen) and renew it by air that is full of CO2. For this reason, it is equally important to train indoor and outdoor marijuana plants to maximize airflow around the leaves and inside of the canopy.
The main difference, however, is that outdoors plants have the extra pressure from pests while indoor plants generally don’t. This is why we highly recommend defoliating outdoor plants at least once a month to clear out all old leaves that are turning yellow, not catching any more light, or that are blocking airflow to the middle of the plant. As long as you don’t create pockets of clustered leaves, you should be safe from the pressure of pests!
Behind the Leaves: Why Does Defoliation Increase Yields?
1. Light Absorption
One of the main purposes leaves serve is that of catching light, just like solar panels. The more exposure to light they have the more photosynthesis they will be able to contribute to the plant, and the bigger the plant will get. Conversely, if leaves are covered or shaded, they will not be able to photosynthesize. It would be the same as putting one solar panel on top of another - the bottom panel won’t catch light. This is why it is important to prune leaves and branches that are shaded by 2 or more other leaves on top of them, or that are touching one another.

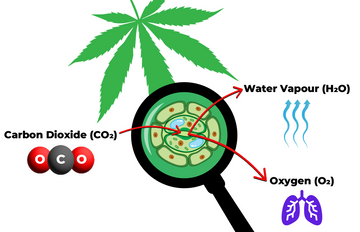
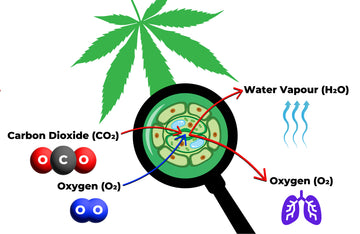
2. Transpiration
Transpiration is the process by which water vapor and oxygen leave the plant through the stomata - these tiny little openings under the leaves. At the same time this happens, CO2 enters the leaf from the air, thus allowing the photosynthesis process to happen.
In fact, 95-99% of all the water that plants consume through the roots go back out into the air through the leaves while only 1%-5% stays in the plant and gets converted into sugars. This means that if your plant consumes 1 liter of water per day, it is "vaporizing" around 950-990 ml back into the air. So why do plants waste so much water?
Well, it's not really a waste. Something else that happens while all of this water comes up from the roots is that the stems, leaves, and flowers take up all of the nutrients in it. So via transpiration, plants are pulling water from the ground, filtering out the nutrients and a little bit of that water for photosynthesis, and evaporating the rest of the water into the air.
This is why it is so important to prune everything that is blocking airflow within your plant, otherwise the humid air can never be carried away and exchanged for dry air full of CO2 again.
3. Nutrient storage
Another purpose that leaves serve is storing the nutrients they just absorbed from the water, so that they can use them later. Nutrients like N, P, K, and Mg are mobile, meaning that your plant can remobilize them from the old leaves to the new ones if they are suffering deficiencies. For example, when the leaves at the bottom of your plant start to go yellow, they are simply "donating" their stored Nitrogen to the new leaves, shoots, and flowers at the top.
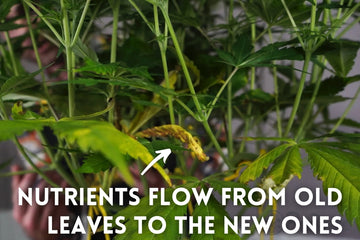
That’s why having a certain amount of green and healthy leaves is always important - it helps your plant remobilize those stored nutrients to its most vital parts. If you strip your plant naked like some folks do, you leave no buffer for it to mitigate nutrient deficiencies.
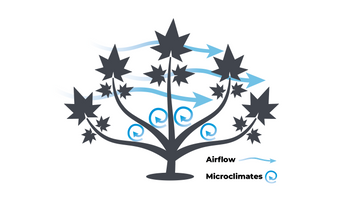
Enemy #1: Microclimates
Microclimates are little pockets of air in different parts of your growing space that are different from the overall climate you set. For example, you can set a temperature of 26C/79F and RH55% in your fancy exhaust fan, but if you measure the middle of your canopy you will end up with a cooler temperature and higher RH.
Microclimates are most common on the corners of your growing space, the underside of your canopy, and in the middle of the canopy where it’s humid. Since these areas are usually more shaded and have less airflow, they make the perfect environment for pests to thrive in and the worst environment for photosynthesis to happen - due to what is called photorespiration, which is the opposite of photosynthesis.
Enemy #2: Photorespiration
Plants don’t just absorb CO2 during photosynthesis, they also absorb oxygen “by mistake” in a process called photorespiration - where instead of producing sugars, they consume sugars - becoming smaller instead of bigger. This is the reason why the leaves inside your canopy are smaller - because there is too little CO2, which means the leaves are “respiring” more than “transpiring”, i.e. consuming more than producing.
To summarize: shade + stale air = less CO2 + less light = more photorespiration + less photosynthesis = smaller plants/leaves/bud sites + more pests
Don't be afraid!
It is very common for new growers to fear defoliating and pruning their cannabis plants. After all, you are hurting them by cutting it up. But if you start slow and follow the rules you just learned, you will always have great results!
Learn to Grow Big Buds
And be the first to hear about new articles, product releases, and special events.
About The Author
Henrique, the CEO of BudTrainer®, is a mechanical engineer with a commercial cannabis production post-grad, and is also a former commercial cannabis consultant.
H takes plant science principles and breaks them down into simple steps for home growers to achieve the same results as the pros and grow the highest-quality cannabis.
The BudTrainer Method™
Continue Learning