DISCLAIMER: Here at BudTrainer we have trained countless plants and broken more branches than we can count. We've also researched everything there is to be researched on the topic, and even got a college degreein commercial cannabis production to learn a bit more. To help you, we have gathered all of our knowledge and put it together in a way that is clear for you to understand, and easy for you to apply.
_______
- Experience level: Intermediate
- When to start: In final pot, after 5th node
- Space needed (indoors): 2’ by 2’ per plant, or 3’ by 3’ if you want to push it
- Space needed (outdoors): We have grown mainlines that are 8’ by 8’ wide
- Mainlining Clones: Not recommended (uneven nodes)
- Mainlining Autoflowers: Not recommended (not enough time to recover)
______
What you need:
- Soft gardenties
- Pruning shears or thin tip scissors
- Hole punch or a pointy knife (or use a training pot)
- LST clips for training your plant at later stages (optional)
- Grafting tape or duct tape (in case of accidents)
Advantages of Mainlining cannabis plants:
- Higher concentration of cannabinoids on top colas
- Larger colas and almost no popcorn bud
- More airflow through the canopy and fewer pests
- Creates lower profile and more bushy plants
- Makes you a much better plant trainer
Disadvantages of Mainlining cannabis plants:
- Takes very long on vegetative stage (minimum 8 weeks)
- Training can be very time consuming
- Decreases overall biomass and yield
- Most prone to bud rot and other molds (outdoors)
- Highly stressful for the plant
So what defines a Mainline, really?
The “Mainline” terminology was created by a famous grower called Nugbuckets, who used the technique on his cannabis plants in order to create denser and bigger buds, and most importantly: buds that are almost always equal to one another.
The reason why the colas end up so similar is because mainlining ultimately “splits” the plant into multiple symmetrical branches. This, in turn, forces the plant to distribute nutrients throughout these branches, allowing them to grow at the same rate. This outdoor mainline that I grew in 2020, for example, ended up with 16 nearly equal colas and yielded 8 ounces of bud.


Backyard mainline with 16 colas (strain: Bruce Banner)
Why should you do a Mainline (or not)?
Mainlining is not the highest-yielding training technique, no matter what everyone else says. But mainlining does produce top shelf bud and, quite frankly, is a lot of fun to do at least once or twice in your life. It’s like doing bonsai, but for weed!
The reason why mainlines don’t yield as much weight, when compared to other training methods, is because it is a very stressful training technique for the plant. Mainlining, different from Low-Stress-Training (LST), is considered a High Stress Training (HST) technique. Not only is there a lot of bending, but there is also a lot of topping and pruning, which forces the plant to remobilize its growth hormones far too often. If you are planning on mainlining, make sure you leave at least 6 to 8 weeks for vegging!
However, if there is one thing that mainlining is really good for, it is to teach you how far you can train cannabis plants. If you haven’t used this method before, do yourself a favour and try it at least once!

 Harvest from the mainlined Bruce Banner above: lots of top colas and few popcorn
______
BEFORE GETTING STARTED
BudTrainer tip #1: do not use thin strings or wires to tie your plants since they will cut through the epidermis (the outer skin), which will limit the ability of your plants to transport sugars and thus to grow. Instead, use rubber-covered ties that are soft and won’t hurt your plants, like the extra thin and soft

BudTrainer tip #2: if you break any branches while doing this, don’t worry - we’ve broken countless branches in the past, and we assure you that your plants will recover in no time. Just keep some grafting tape or duct tape with you in case you have to glue a branch back together. It works 90% of the time.

BudTrainer tip #3: when choosing which branches you want to train, make sure that you pick the stems that are still soft and bendy. If they appear hard and woody they are likely to crack, and sometimes you will not be able to recover from that damage.

 Soft tissue versus woody tissue: always choose soft tissue to train
MAINLINE: THE PROCESS

Step 1 - Preparing pots
When: Right away
NOTE: fabric pots are better for your plants (and the environment!) since they allow the sides of the media to breathe, which in turn prevents root circling. With fabric pots, the roots of your plant are always growing from the inside out, which makes them much stronger and ultimately allows your plant to yield more bud.
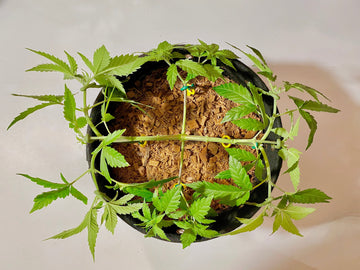
Before you even plant your seed or transplant your seedling, punch holes around the edges of your final pot. We like to punch 8 holes per pot in a pizza-like fashion so that they are well-distributed. Use your hole punch or knife for this. Alternatively, use a training pot that already comes with holes.
 Training pot with reinforced holes
_______
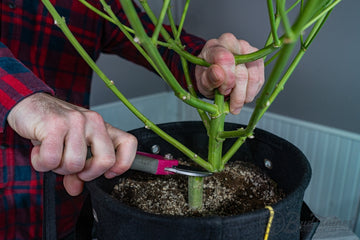
Step 2 - Topping #1
When: After your seedling has started showing the 5th node (each node is a pair of opposite leaves + growth sites). In the picture below, the 5th node is just starting to come out.

 Cannabis plant with 5 nodes
NOTE: Many growers wait far too long to top their cannabis plants, at which point they are cutting out a really thick piece of stem and wasting all of that energy that the plant put into it. We personally prefer to top as soon as the 5th node pops its head out, like in the girl scout cookies above.
This one is quick: just top your seedling above the 3rd node (read this article to understand the science and the method behind topping), and remove all growth sites (the little shoots that grow out from the base of the leaf) + leaves on the 1st and 2nd nodes. Alternatively, you can choose to leave only the leaves on the 1st and 2nd nodes - what is important is to remove the growth sites (see video below).
* Sometimes, the growth sites on the 1st and 2nd node are so small that you can’t cut them off yet - in this case, wait a couple of days and then cut them (like in the video below) *
** The 1st set of round little leaves does not count as a node - those are cotyledons and they are nutrient reserves for your seedling when it is born *
VIDEO: topping a cannabis mainline for the 1st time
PRO TIP: Make sure you leave a stub behind when you top, otherwise your branch can split.
_______
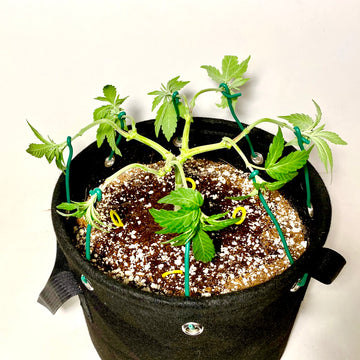
Step 4 - Topping #2 & Training #1
When: 10 to 15 days after topping for the 1st time (or once the 2 new growth sites are 3”-4” long)
At this point, your new growth sites should have 3 to 5 nodes each (in the girl scout cookies above, the 3rd node is just starting to appear), which means it is time to top each branch again.
The thing is, you don’t necessarily have to top above the 3rd node this time - you can instead top above the 1st node, like we show in the 17-sec video below. What is important on a mainline is to do things symmetrically, so if you choose to top at the 1st node on one side, make sure you top at the 1st node on the other side as well.
VIDEO: Topping a cannabis mainline for the 2nd time, at the 1st node
P.S. In the video above, we chose not to train the two branches to the side because they were too short to begin with. However, if your remaining branches are longer than a couple of inches, or if you decided to top at the 3rd node instead of the 1st, you can train your plant for the 1st time.
Step 5 - Last Topping (#3) & Training #2
When: 10 to 15 days after the 2nd topping (or once the 4 new growth sites are 3”-4” long)
This step is simple: train the branches to the side so that they can grow back up, just like in the photos below. In order to do this, you can either use anchor stakes + garden ties like we do, or you can use the sides of your training pots + garden ties instead. The last option, if you don’t have either anchor stakes or training pots, is to tie your 4 branches to the middle of your main trunk like Nugbuckets does.
Once you have trained your plant to the sides, like in the pictures above, you can top them for a 3rd and last time at the 1st node (or the 3rd, if you prefer). Alternatively, if you want to take clones from your plant, you can wait another 4 to 5 days, like we did, and then top it.
VIDEO: Topping a cannabis mainline for the 3rd time after 5 days from training
BONUS: Clones from the tops of a mainline are extremely rich in auxins - a growth hormone - which means they root really fast and grow vigorously thereafter. Here is a bonus video on how to plug your cuttings right after you top your mainline!
VIDEO: Taking clones after topping a cannabis mainline for the 3rd time
_______
Step 7 - Defol/Pruning #1 & Training #3
When: 5 to 10 days after the 3rd topping (or once the 8 new growth sites are 3”-4” long)
Since you will be flowering this plant soon, it is important to remove all leaves that are yellow, that are not catching light, and that are blocking significant airflow through the plant. This will ensure that the plant grows vigorously throughout the stretch phase of flowering (the first 20 days). In the video below I am doing a very aggressive defoliation, and the reason why I prefer it this way is that it forces the stalk to send its “juices” only to new growth instead of old leaves.
VIDEO: Pruning and training mainline cannabis plant before flowering
Once pruning is done, train the branches to the side so that they can grow back up. By this point, you can definitely use the sides of your training pots and garden ties to fix your branches. The last option, if you don’t want to poke holes around or if you don’t have training pots, is to use a tomato wire around your plant so that you can tie your branches to it.
Once Step 6 is complete, you can let your plant grow for another 3 to 4 days to recover from this stress, and then flip it to flower!
OR
You can wait another 10 to 15 days instead, and top it a 4th time: leaving you with 16 main branches. And then again, you can do it a 5th time after another 10 to 15 days, leaving you with a total of 32 branches. While this is not recommended indoors (it takes too long in veg), when you are growing outdoors you do have the benefit of time. This plant, for example, was topped into 32 main colas, and it could have easily been topped again, into 64. The total yield for this cheese strain was 1lb2oz!

 Outdoors cannabis plant that was mainlined to 32 main colas
_______
Step 8 - Defol/Pruning #2
When: After week 3 (or day 20) of flower
This is your last opportunity to defoliate before the plant starts putting on weight. So go ahead and remove all lower leaves that are not catching light, all leaves that are blocking airflow in the middle of the plant, and also all yellowing/dying leaves. Leave only enough leaves to cover the canopy area (i.e. don’t leave holes in the middle of your plant).
Also, at this stage your plant will stop growing in height and will start growing in thickness, which means it’s your last chance to train any branches. If you have LST clips, this is the best time to use them. They will help widen your canopy so that your colas can get even bigger!
PRO TIP: If you have a trellis net, this is when you want to put it up so that it can help support your colas. When your colas are supported they are able to get bigger, put on more weight, and give you more bud.


_______
Step 9 - Defol/Pruning #3
When: 1 to 2 weeks before harvest.
This is the final stretch, which is when your plant is filling up those trichomes with cannabinoids and still putting on girth. At this stage, we recommend you do one last aggressive defoliation and remove all leaves that are small, yellowing, not getting enough light, blocking airflow, and blocking light from the top of other colas. This will also help tremendously during harvest time, when you won’t have nearly as much to trim.

_______
That’s it, folks! This concludes your mainlining journey and it’s time to reap the fruits (some fine-ass awesome buds) of your labor.
As always, happy growing!
P.S. after harvesting, we prefer to hang dry, and then dry trim. We recommend drying for 5 to 10 days at 60% relative humidity (makes for a slow drying process), and then we cure everything in glass jars for another 21 days (burping it daily).
Want to take your cannabis training to the next level? Check out BudTrainer's unique selection of cannabis training equipment.