DISCLAIMER
Everything taught and sold by BudTrainer is to be used strictly for legal purposes. We absolutely condemn the production of illegal substances, and it is your duty to ensure that you are complying with the law. The words "hemp", "cannabis", "weed", and "marijuana" are used interchangeably to refer to the same plant (legal hemp with less than 0.3% THC) for the purposes of this lesson.
Lessons #7,8,9, &10
How to Harvest, Trim, Dry, & Cure Your Plants for Maximum Potency
Updated on Aug 04, 2022

In this lesson, you will learn:
" Harvesting cannabis all comes down to a few key reasons."
1. Better
smokability

2. More
cannabinoids

3. More
terpenes

4. Prevents
molds

Did you know that...
100% of legal commercial cannabis growers have a specific harvest window and they follow specific techniques to dry, trim, and cure their weed plants? In fact, this is what allows them to output consistent, high-potency cannabis every single time.
No more waiting. Let’s get right into it!
Harvesting, Trimming, Drying, & Curing
"The BudTrainer Method"
Tools needed:
- Garden trimmers/scissors
- Baking trays or large plates
- Drying rack or hangers
- 2-way humidity packs
- Jeweler’s loupe 30x-60x
- Disposable gloves
- Garden wire/ties
- Mason jars
- Mini hygrometers (optional)
Difficulty Level:
Beginner


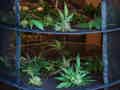
WHEN to Harvest
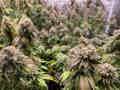
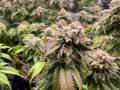
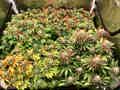
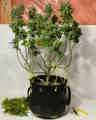
Cannabis buds ready for harvest
Method #1: Actual Flower Period
Which strain of cannabis are you going to be harvesting? Each strain of cannabis has a unique flowering period and thus requires a different amount of days to mature. Some strains only flower for 7 to 8 weeks before they are ripe, while other strains need to flower for an entire 12 weeks. Knowing the length of your flowering cycle before you grow allows you to know when to expect your plants to mature before they show signs of maturity.

Simple Google search for Blue Dream’s flowering period
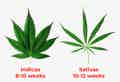
Flowering time for indicas vs sativas, in general
Method #2: Pistil Color
Pistils 50% brown and 50% white
Pistils nearly 95% brown
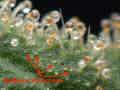
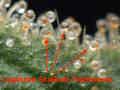
Method #3: Trichome Color
The most accurate way to tell when it is time to harvest is by checking the color of the trichome heads on your flowers with a jeweller’s loupe or a microscope (30x to 60x magnification).
In order to accomplish this, you can either look directly at the trichomes on your plant, or you can cut a small leaf sample to look at on top of a table instead.
TIP: sometimes it can be hard to focus on the trichomes with the loupe from far away. To avoid this, place the lens at 0.5" away from the trichomes you are inspecting, and then adjust your distance back and forth until you achieve focus.
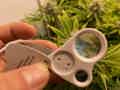
Using a jeweller’s loupe to check trichomes
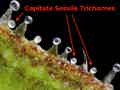
"Trichomes are the Crystals AKA Kief AKA Dry Sift AKA You Name It"
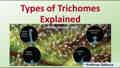
The 4 different types of trichomes (Source)
Method #3: Continued...
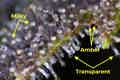
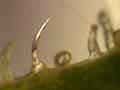
The different colors of cannabis trichomes
Always look at the trichomes on the biggest buds
Learn to Grow Like The Pros
HOW to Harvest
What is wet-trimming and dry-trimming?
Wet Trimming
Trimming your flowers before the drying process starts (AKA right after harvest).
Dry Trimming
Trimming your flowers after the drying process has finished.
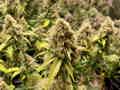
Cannabis plant harvested branch-by-branch and wet-trimmed
Cannabis plant dried whole, about to be dry-trimmed
The Pre-Harvest Wet Trim
Before the Pre-Harvest Wet Trim
After the Pre-Harvest Wet Trim
Harvesting Method #1: Whole Plants
Harvesting a cannabis plant whole

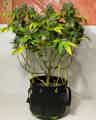
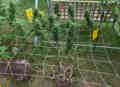
This plant has a trellis and is too big to be harvested whole
Harvesting Method #2: Branch-by-Branch
Cannabis plant being harvested branch-by-branch
Want to train your plants like the ones in this article?
Drying Cannabis
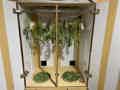
Drying Method #1: Whole Plant
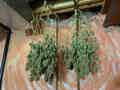
Hanging marijuana plants to dry whole
Drying Method #2: Branch-by-Branch
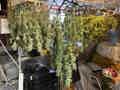
Cannabis branches hanging from clothes hangers
Cannabis branches drying in a drying rack

Mini hygrometers for measuring drying conditions
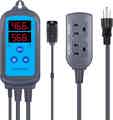
Humidity controller that maintains a constant RH

Recommended cannabis drying times

When you hear a "crack" sound, it’s time to dry-trim and cure
Learn to Grow Like The Pros
Dry-trimming Cannabis
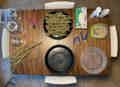
Trimming table ready for dry-trimming

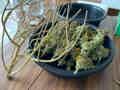
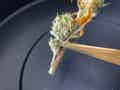
Cannabis bud that was just dry-trimmed and is ready for curing
Step 1: Cutting Branches
If you dried your plant whole, now is the time to cut it up into branches. For this, we usually like to set aside a tray where we can chop all branches into. If you dried your plant branch-by-branch, just place the branches into a similar tray.

All branches were cut off from the main stem and are ready to trim
Step 2: Trimming Fan Leaves

Cutting fan leaves off with the Slide’N’Snip technique
Slide’N’Snip: slide the blade to the base of the leaf
Slide’N’Snip: once at the base, cut the leaf
Step 3: Manicuring Sugar Leaves
Once you are done cutting all the fan leaves on a branch, it is time to start manicuring (AKA trimming at a precise scale) the sugar leaves that are sticking out of the bud. When cutting sugar leaves, place your trimmers in a position that you can easily open and close at a fast speed, almost like a hair buzzer operating, and cut away on top of your trimming tray.

Manicuring: cutting sugar leaves off
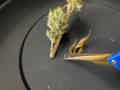
Step 4: Cutting Buds
After you are finished manicuring your buds and everything looks pretty on your branch, you can cut each bud at the base and separate them into the small buds pile and the large buds pile. We recommend curing them in separate jars because the small pile often finishes curing earlier and the large pile usually yields higher potency buds.

Separating small vs large manicured buds
Want to train your plants like the ones in this article?
Curing Cannabis
This is not ideal because it means your weed has different levels of moisture content across its profile - the outside being dry and crunchy (at the ambient 60% RH) and the inside still being soft and wet (at more than 60% RH).
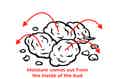
Flow of moisture when buds are drying and curing
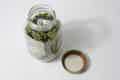
How to Cure Weed
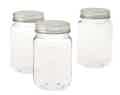
In order to make sure the internal moisture comes back out, you need to cure your buds. Curing involves placing your recently trimmed flowers into airtight containers (we recommend using mason jars that sell at Walmart) until the moisture from the inside of the bud has come out and evened out with the dryness from the outside.
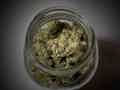
Cannabis flowers curing inside a glass mason jar
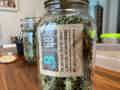
Curing jar with a 58% RH humidity pack inside
These humidity packs have a fixed humidity rating and they either bring the moisture level up or down inside of your container. Here at BudTrainer we recommend curing cannabis at a relative humidity of 55% to 60%, so we like to use humidity control packs that are rated at 58%.
Next, comes "burping" your jars.
"Burping" Your Jars
Since there is still a significant amount of moisture to come out of your buds, it is essential that you open your containers (AKA burping) at least twice a day for a minimum of 5 minutes. This will allow the high-humidity air from inside the jar to come out and be replaced by drier air from the outside.
Burping a jar by leaving it open for 5 minutes

Dried and trimmed weed that just began curing
And you are done!
Harvesting, drying, trimming, and curing are the most laborious parts of the entire growing process, and while the concepts are simple it is still extremely important to do them right. We hope you could learn a thing or two, and if you still have questions, just reach out to us!
Want to continue learning? Here are a few more lessons for you!